Welcome To My Blog

This blog contains posts that may benefit ordinary visitors or programmers (particularly .NET programmer).
To view posts related to particular subjects, click the link under Labels.

Thursday, June 27, 2013

Using Unicode in HTML blog

Hi,

Ever wonder how to display Unicode characters on your HTML page?  What are Unicode characters?  Unicode characters are special characters such as the copyright symbol (©), trademark symbol (™) and many others that you normally don't see on the keyboard.

Sometimes you may need to show that characters on your page to make people understand better about your post.

In order to show the Unicode character, you can use the following characters sequence &#x  followed by a hex number that represents the Unicode character and end with the semicolon symbol (;).  For example, to display the ₤ (British pound sterling currency symbol), enter the following code ₤  in your HTML page.

For further info regarding Unicode characters, visit the following site: http://www.unicodetables.com/

Happy coding... :-)

Monday, June 24, 2013

How to disable USB ports during Sleep mode?

I am using Windows 7 Home edition on my Toshiba Satellite M500 notebook computer.  I noticed that even though my notebook was in Sleep mode, all the connected devices such as the LED light, mouse and cooler fan were active (on).  I don't like that situation because it will run off my computer battery very fast.

After searching for information from the internet, I got the idea how to ensure the power to the USB ports are cut off during the Sleep mode.  The following steps work on my notebook:

  1. Go to the Device Manager dialog box. How? Click Start ⇨ Control Panel ⇨ Device Manager.
  2. Make sure the "Allow the computer turn off this device to save power" check box is checked for every USB Root Hub. How? Click Universal Serial Bus controllers ⇨ Right-click USB Root Hub ⇨ In the USB Root Hub Properties, click Power Management tab ⇨ Make sure the check box is checked.  See the picture below.
  3. Make sure Allow this device to wake the computer checkbox for the HID-compliant mouse is unchecked.  How? Click Mice and other pointing devices ⇨ Right-click HID-compliant mouse ⇨ Click Power Management tab ⇨ In the HID-compliant mouse Properties, make sure the checkbox is cleared as shown in the picture below.  Repeat this step for each HID-compliant mouse in the Device Manager list.


  4. Make sure Allow this device to wake the computer checkbox for the keyboard is unchecked.  How? Click Keyboards ⇨ Right-click HID Keyboard Device ⇨ Click Power Management tab⇨ In the HID Keyboard Device Properties, make sure the checkbox is cleared as shown in the picture below.
  5. That's all.  Try making the computer going into Sleep mode and see that all the devices connected to the USB ports are turned off automatically.
I hope the tip above can help us.  Thanks.


Friday, April 27, 2012

Memilih Teks Secara Blok dalam Microsoft Word 2010


Salam sejahtera semua,

Hari ini saya nak berkongsi satu kaedah cepat untuk memilih teks secara blok dan seterusnya formatnya kepada Format Style tertentu.  Sebagai contoh, anda mungkin pernah menyediakan teks seperti di bawah.

BUTIRAN PERIBADI
NAMA PENUH:   Hamba Allah
ALAMAT:             No. 123, Jalan Empat,
                             Taman Lima,
                             67890 Bandar Sepuluh,
                             Negeri Sembilan
TELEFON:           012-345 6789
E-MAIL:               hamba_Allah@gmail.com


Tahukah anda kaedah cepat utk format tajuk-tajuk baris (seperti NAMA PENUH, ALAMAT, TELEFON dan E-MAIL) kepada format seperti di bawah tanpa melibatkan teks yang bukan tajuk?

BUTIRAN PERIBADI
NAMA PENUH: Hamba Allah
ALAMAT:           No. 123, Jalan Empat,
                             Taman Lima,
                             67890 Bandar Sepuluh,
                             Negeri Sembilan
TELEFON:          012-345 6789
E-MAIL:              hamba_Allah@gmail.com

Bagi yang tak tahu mungkin akan memilih teks dan formatnya kepada tulisan tebal (bold) secara satu persatu.  Sebenarnya ada cara cepat untuk memilih tajuk itu sahaja.

Dalam kes ini, klik pada permulaan tajuk NAMA PENUH.  Kemudian tekan kekunci Alt di keyboard sambil menekan butang kiri mouse dan mengheret mouse sehingga akhir tajuk E-MAIL. Pilihan anda meliputi semua tajuk yang dikehendaki seperti yang kelihatan dalam gambarajah di bawah.


Sesudah itu formatkan pilihan anda, contohnya dengan butang Bold.

P/S Credit to http://www.techrepublic.com/blog/msoffice/select-a-vertical-block-of-text-in-word/2658


Wednesday, July 6, 2011

How to configure your streamyx modem

Hi everybody,

Are you a Telekom Malaysia (TM) streamyx subscriber (Malaysia No 1 Internet Provider)? If you received a Wifi/Router Modem from TM, you can configure it using any computer. How to do it?

The steps are as follow:


  1. Connect the UTP cable from your computer to the modem.

  2. Open your browser, for example Internet Explorer.

  3. Enter the IP address, http://192.168.1.1/

  4. You'll see login screen which is actually login for the router/modem configuration interface. Normally, we enter "tmuser" both for the username and password.

  5. If the login is successful, you'll get the next screen displaying the device information. At the top right hand corner you can see the Wizard button. Click that button, if you want to use the Wizard to configure the wifi network setting such as Network Name (SSID) and the Network Key (to prevent unauthorized user from accessing your network).

  6. Once you have finished with the configuration, you may need to restart the modem to use the new settings.

That's all.

Friday, June 24, 2011

Paparkan Semula Folder Yang Tersembunyi

Salam sejahtera semua.

Pernahkah anda alami situasi di mana pendrive anda dijangkiti sejenis virus yg mana semua folder yg berada di root folder di sembunyikan dan digantikan dgn shortcut? Walau pun virus berjaya dihapuskan dari pendrive dan sistem komputer tapi anda masih gagal memaparkan semula folder-folder tersebut.

Bagaimana anda atasi masalah tersebut?

Ada pelbagai cara yg dicadangkan di forum-forum internet. Antaranya kita diminta mengubah registry dgn menggunakan arahan regedit.

Saya mencuba kaedah-kaedah yg dicadangkan malangnya ia gagal memaparkan semula folder-folder yg tersembunyi tersebut.

Rupanya ada cara yg lebih mudah dan berkesan untuk mengatasi masalah tersebut iaitu dgn menggunakan arahan DOS yg namanya ATTRIB.

Arahan ATTRIB ialah arahan utk setkan attribute sesuatu folder dgn H (hidden), S (system), A (archive), dan/atau R (read only).

Cara penggunaannya:

Utk sistem Windows XP,
  1. Klik Start => Run...
  2. Dlm kotak Run, taip cmd dan tekan Enter.
  3. Anda akan melihat Command Window yg berwarna hitam.
  4. Jika pendrive adalah F:, taipkan arahan berikut di command prompt dan akhiri dgn menekan Enter:
  • attrib -s -h f:\*.* /s /d
(Arahan di atas bermaksud buangkan attribute System dan Hidden dari semua fail termasuk directory dan sub-directory yg berada di drive F:.)

Utk sistem Windows 7, gantikan arahan di langkah (1) & (2) di atas dgn langkah berikut:
  1. Klik butang Start
  2. Dlm kotak Search, taip cmd dan tekan Enter.


Friday, June 17, 2011

Calculating Dates with Years and Months

Hi. Good day everybody...

Some people may wonder how to calculate the date difference between two date values in Excel. It may be easy if you just want to show the difference in floating number (number with decimal). For example, if the first date is a birth date stored in cell B1 and you want to show the difference in cell B2 as number of years, you can simply write the expression in cell B2 as the following:

=(TODAY()-B1)/365

On the other hand, if you want to show the answer as number of years and months, it's not that simple. The expression can be as long as the following (or may be even longer):

=IF(MONTH(TODAY())>=MONTH(B1),
(YEAR(TODAY())-YEAR(B1))&" years "&(MONTH(TODAY())-MONTH(B1))&" months ",
(YEAR(TODAY())-YEAR(B1)-1)&" years "&(12+MONTH(TODAY())-MONTH(B1))&" months ")

Anyway, what the above expression means ...
IF the MONTH in today's date is greater than or equal to the MONTH in cell B1, calculate number of years using the YEAR in today's date minus the YEAR in cell B1 and calculate number of months using the MONTH in today's date minus the MONTH in cell B1. Otherwise, if the MONTH in today's date is less than the MONTH is cell B1, calculate number of years using the YEAR in today's date minus the YEAR in cell B1 minus 1 and calculate number of months using the MONTH in today's date minus the MONTH in cell B1 plus 12. In other words, if the person's birth date not yet reach its anniversary, we have to minus 1 to the difference of years and add 12 to the difference of months.

Tuesday, July 13, 2010

Missing Icons in Windows 7

Salam sejahtera semua...

Sudah agak lama saya tidak update blog ni iaitu semenjak syarikat saya bekerja menggunakan internet filtering yang mana kebanyakan laman tidak boleh lagi dibuka termasuklah laman blog ni.

Nak gunakan Celcom broadband untuk update pun tak berapa sesuai. Nama aje broadband tapi apa yang saya dapat macam narrowband aje. Lembab sungguh hingga saya tak ada mood nak menulis blog.

Baru-baru ni saya telah membeli sebuah notebook baru jenama Toshiba model Satellite M500. Ia menggunakan operating system Windows 7 Home Premium. Seperti biasa, saya ni pantang dapat notebook atau handphone baru. Selagi boleh saya akan cuba install macam-macam aplikasi ke dalamnya.

Pada suatu hari saya dapati ada antara image untuk shortcut(icon) yang dipaparkan dalam Start Menu, di atas Desktop dan Taskbar hilang. Walau bagaimana pun shortcut tu masih berfungsi seperti biasa untuk jalankan aplikasi yang sepatutnya. Saya agak keliru tapi saya malaslah nak tanya rakan sekerja. Jadi saya tanya pakcik Google - teman sejati saya.

Alhamdulillah, jumpa beberapa link yang berkaitan dengan masalah yang saya hadapi. Link yang saya cuba datangnya dari Windows 7 Forums. Ia benar-benar membetulkan masalah yang telah saya hadapi. Apa yang saya buat ialah saya telah padamkan IconCache.db yang menyimpan image untuk setiap icon yang digunakan di atas Desktop, Start Menu dan Taskbar. Dalam Windows 7, iconcache ini spesifik untuk setiap user. Kalau dipadam, Windows 7 akan buat semula secara automatik.


Langkah yang patut anda ikuti untuk bina semula IconCache.db:
  1. Buka Start Menu. Kemudian taip cmd dalam kotak Search dan tekan Enter.

  2. Buat seperti dalam gambar bila tetingkap command prompt keluar.
  3. Log off kemudian log on supaya Windows 7 bina semula iconcache.db yang baru untuk menggantikan iconcache.db yang telah terpadam.
    - atau -
    Anda juga boleh bina semula tanpa log off dengan mengikuti langkah berikut:

a) Tekan Ctrl+Shift+Esc untuk keluarkan Windows Task Manager.

b) Dari senarai Processes, pilih explorer.exe dan kemudian tekan butang End Process. Desktop akan menjadi kosong.

c) Di Windows Task Manager, buka menu File dan pilih arahan New Task (Run...)

d) Dalam kotak dialog Create New Task, taip explorer dan tekan OK. Desktop akan kembali seperti sedia kala. #

Sekarang anda akan lihat setiap shortcut memaparkan semula icon yang sepatutnya. Senang aje kan?

Sila klik sini untuk lihat kaedah lain dari Windows 7 forum.

Monday, August 10, 2009

Using Web Service in ASP.NET

A Web Service (also Webservice) is defined by the W3C (World Wide Web Consortium) as "a software system designed to support interoperable machine-to-machine interaction over a network. It has an interface described in a machine-processable format (specifically WSDL - Web Service Description Language). Other systems interact with the Web service in a manner prescribed by its description using SOAP (Simple Object Access Protocol)-messages, typically conveyed using HTTP (Hyper Text Transfer Protocol) with an XML (Extended Markup Language) serialization in conjunction with other Web-related standards."


Please follow this link to get additional information about the web service from Wikipidia.


What is a web service in the context of ASP.NET? A web service can be considered as a remote software component. In this case, the component that resides in a hosting server offers functionalities that can be consumed by any application remotely via the internet.


CREATING A WEB SERVICE FILE


In ASP.NET, we can create a web service file with the extension ".asmx". We can use any of the .NET supported languages to write the codes. However, it is recommended to use C# programming language due to its efficiency and strong type support.

The picture below shows an example of a web service file.
As you can see from the picture, the web service file (asmx) has a page directive such as

<% @ WebService Language="VB" class="TestWS" %>

which describes the language used in the page and name of the class. In this case the language is VB.Net and the class name is TestWS.

Every method that you want to expose as a web method must be declared with the webmethod attribute and public access modifier. Once a method is declared as a web method, it can be called remotely by any other application via the web/internet.

Since the web service is using HTTP, it must be placed in a web application folder of the web server. This works almost similar to the ordinary web application.


CONSUMING THE WEB SERVICE

To consume a web method in the web service file, we must first create a proxy file in our machine using the WSDL tool that comes with Visual Studio. The following is an example how to use the WSDL command-line tool to create the proxy file (note that D:\webservice> is the DOS command prompt where you type the command -- D:\ is the drive and webservice is the folder name),

D:\webservice>wsdl http://www.wakiltakaful.com/mywebservice/testws_vb.asmx
/language:vb /namespace:safuan

In this case, the default output file that is created will be named TestWS.vb and the content is as shown as in the picture below.

Now we can use the VB command-line compiler to compile the proxy file to an assembly as shown below:
D:\webservice>vbc testws.vb /target:library
The output file will be testws.dll.

Once you have the assembly, you may make reference to it in your winform or webform application. If you use Visual Studio, the assembly will be copied locally in the bin folder of the application folder.

The picture below shows how the proxy is added to a web application folder.
And the picture below shows the VB code to use the proxy.
And finally the picture below shows how the web service works!
Remember that the assembly only contains the definition not the actual program logics. The program logics is in the web service file located in the remote server. In other words, you still must have a working internet in order to use the web methods.

Tuesday, August 4, 2009

Opening A Web Application From VS2005


Welcome back... In this article I would like to tell how to open a web application that you have copied from somebody else from Visual Studio 2005. I am assuming that you have a running Internet Information Services (IIS) in your system.

Simply follow the steps below:
  1. Copy the folder containing the web application to the \Inetpub\wwwroot folder. (This is the default folder for IIS.)Note: Actually, you may copy the application folder to any folder in any drive but it will be easier if you copy it to the default folder used by IIS.
  2. Open IIS. In IIS, expand the Default website folder until you see the application folder you just copied. (It may appear with yellow folder icon.) Right click the folder name and choose Properties from the context menu that appears. Click the Create button from the dialog box followed by the OK button.

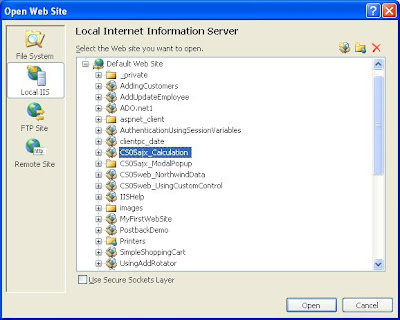
    The yellow folder icon changed to an opened package icon as shown below.
  3. Open Visual Studio 2005. In VS2005, open the File menu and choose Open Web Site. In the Open web site dialog box, click the Local IIS tab and select the web site you want to open followed by the Open button.

Thursday, March 19, 2009

ADAB MENDENGAR AZAN

ADAB MENDENGAR AZAN

Kematian itu pasti menjelma. Hanya masa Dan waktunya Yang tidak Kita ketahui.Cuba Kita amati. Mengapa Kebanyakan orang yg nazak, hampir ajal tidak dapat Berkata apa-apa.. Lidahnya kelu, keras Dan hanya mimik Mukanya yang menahan kesakitan ' sakaratul maut' .

Diriwayatkan sebuah hadis yg bermaksud:

'Hendaklah Kamu mendiamkan diri ketika azan, jika tidak Allah Akan kelukan lidahnya ketika maut menghampirinya. '

Ini jelas menunjukkan, Kita disarankan agar mendiamkan Diri, jangan berkata apa-apa pun semasa azan Berkumandang . Sebagai orang beragama Islam Kita wajib Menghormati azan Banyak fadhilatnya .

Jika lagu Kebangsaan Kita diajar agar berdiri tegak Dan diamkan Diri. Mengapa ketika azan Kita tidak boleh mendiamkan diri? Lantas sesiapa yang berkata-kata ketika azan, Allah Akan kelukan lidahnya ketika nazak . Kita takut dengan Kelunya lidah Kita semasa ajal hampir tiba maka Kita Tidak dapat mengucap kalimah 'Lailahaillallah. .' yang Mana sesiapa yang dapat mengucapkan kalimah ini ketika Nyawanya akan dicabut Allah dgn izinNya menjanjikan Syurga untuk mereka.

Dari itu marilah kita sama-sama menghormati azan dan mohon kepada Allah supaya lidah ini tidak kelu semasa nyawa kita sedang dicabut. 'Ya Allah! Anugerahkanlah kematian kami dengan kematian yang baik lagi mulia, lancarkan lidah kami mengucap kalimah 'Lailahaillallah. .' semasa sakaratul maut menghampiri kami.. Amin... amin.. amin Yarobbala'lamin. .'

Sesuatu yang tak pernah terjangkau dek akal fikiran ku ini. Subhanallah. ..

Ketahuilah bahawa pada setiap waktu, ribuan bilal di merata dunia akan melaungkan azan, mengakui 'Bahawa Allah Sahaja Yang Patut Disembah, dan Nabi Muhammad Adalah Rasul Allah.'Dimulakan dengan Indonesia yang terletak dibahagian timur dengan ratusan kepulauan-nya dan jumlah penduduknya seramai 180 juta.

Sebaik masuk waktu Subuh, Azan mula berkumandang dari kawasan ini dengan ribuan Bilal yang akan melaungkan Ke-Agungan Allah S.W.T Dan Nabi Muhammad S.A.W.
Proses ini akan bergerak kearah barat kepulauan Indonesia . Perbezaan masa antara timur dan barat Indonesia adalah 1-1/2 jam.Belumpun laungan Azan dimerata Indonesia selesai, ianya bermula pula di Malaysia.Berikutnya di-Burma dan dalam masa satu jam selepas Azan dilaungkan di-Jakarta, tiba giliran Dacca di Bangladesh.Berikutn ya laungan akan kedengaran di Calcutta dan terus ke Srinagar dibarat India.

Perbezaan waktu dikota-kota Pakistan adalah 40 minit jadi dalam jangka masa ini, Azan akan berkumandang diseluruh Pakistan.Belum berakhir di-Pakistan, Azan akan bermula pula di Afghanistan dan Muscat.Perbezaan waktu antara Muscat dan Baghdad adalah satu jam. Dalam jangka masa ini, Azan akan berterusan dilaungkan di UAE, Makkah, Madinah, Yaman, Kuwait dan Iraq .

Proses ini berterusan setiap detik sehingga ke pantai timur Atlantik.Jarak masa Azan mula dilaungkan di Indonesia sehingga ke pantai timur Atlantik adalah 9-1/2 jam.Belumpun Azan Subuh berkumandang di pantai Timur Atlantik, Azan Zuhur kini sudah mula dilaungkan di Indonesia. Ini berterusan bagi setiap waktu sembahyang, tidak putus-putus.

Subhanallah, begitu hebat dan agungnya Islam!
Kalaulah setiap kawasan boleh memasang pembesar suara (yang power habis!), akan bergegar satu dunia dengan laungan Azan tidak putus-putus.

Allahu Akhbar!

p/s Petikan di atas di ambil dari e-mail yang dihantar kepada saya.

Tuesday, February 17, 2009

Using Private Assembly in C# VS2005

This article is intended to beginner/medium level programmer.

Before we continue, let me explain first about the term "assembly" in C#. An assembly is simply a project that you have compiled either into a portable executable or DLL file. If you are using Visual Studio 2005 IDE to create your project, you will notice there are so many project templates that you can choose from. The templates range from Console applications, Windows application, Mobile applications and Web applications.

A project can only be compiled into an EXE assembly if it has the Main method, or else it will be a DLL assembly only.

The assemblies are further categorized into two types - private or shared assemblies. In this article, I will focus on the Private Assembly.

A private assembly may have the extension EXE or DLL. It is termed "private" because the assembly is not shared. Meaning that if you make a reference to a private assembly in your new project, you have to copy the private assembly to the bin folder of your new project. If you are using the VS2005 IDE, copying is done automatically when you Add Reference to the private assembly in the new project. Hence, every time we make a reference to a private assembly, we make a copy of that assembly in the new project.

To understand how to use a private assembly in C#, let we do the following steps to create a class library:
  1. Open VS2005 and create a new project. Make sure you select Visual C# --> Windows --> Class Library.

  2. Named the project as Converter. After a while, the code window appears.

  3. Rename the Class1.cs to Convert.cs in the Solution Explorer window.

  4. Add two methods to the class. One to convert temperature from Celcius to Fahrenheit and another to convert from Fahrenheit to Celcius.
  5. Click the Build menu and choose Build Converter to compile the project.

Assuming that you have created your project in the Visual Studio 2005 default folder, the assembly "Converter.dll" can be found in the folder My Documents --> Visual Studio 2005 --> Projects --> Converter --> bin --> debug/release.

Now let's try to use the created assembly in our new project. Follow the steps below to start a Windows application:

  1. In Visual Studio 2005 IDE, start a new project. From the "New Project" dialog box, select Visual C# --> Windows --> Windows Application template.

  2. Add controls to the form as shown.

  3. Named the control respectively as follows:
    radioButton1 --> Name: rbnCelciusToFahrenheit, Text: Celcius To Fahrenheit
  4. radioButton2 --> Name: rbnFahrenheitToCelcius, Text: Fahrenheit To Celcius
    label1 --> Name: lblInstruction, Text: (blank)
    label2 --> Name: lblResult, Text: (blank)
    textbox1 --> Name: txtTemperature, Text: (blank)
    button1 --> Name: btnCalculate, Text: Calculate

  5. Right click "References" in the Solution Explorer window and select "Add Reference...". Click the Browse tab in the Add Reference dialog box. Navigate to the folder containing "Converter.dll" private assembly that you have created earlier. After clicking OK, you should see the name Converter appears under the References list. If you click the Converter, you notice Copy Local = true in the Properties window.

  6. Double click the btnCalculate. VS2005 IDE takes you to the code window and gives you the event handler named btnCalculate_Click. Add the code in the event handler as follows:

  7. Get back to the Form1 (design). Then, double click the rbnCelciusToFahrenheit and rbnFahrenheitToCelcius radio buttons. You will get the "
    rbnCelciusToFahrenheit_CheckedChanged" and "
    rbnFahrenheitToCelcius_CheckedChanged" respectively. Add codes to the both event handlers as shown:
  8. Now, run your program. Notice that even though the method for converting the temperature is not in the new project, we still be able to execute the code because we have added reference to the Converter assembly.

From the above practice, you see how easy it is to reuse codes that we have done earlier in other project.

Wednesday, October 29, 2008

Penemuan Saintifik - Solat Sebagai Satu Terapi

Sembahyang juga boleh rawat penyakit kritikal

Assalamualaikum (Salam Sejahtera) ...

Baru-baru ini saya telah membaca satu artikel dari Berita Harian Online berkenaan solat.

Hasil kajian yang dibuat oleh Profesor Madya Dr Fatimah (seorang pensyarah Islam dari Jabatan Kejuruteraan Biomedikal di Fakulti Kejuruteraan Universiti Malaya) dan Ng Siew Chok (seorang bukan Islam dari jabatan dan universiti yang sama), mereka mendapati bahawa solat yang diperintahkan Allah kepada umat Islam bukan sekadar perintah tetapi memberi kesan terapi kepada manusia umumnya dan umat Islam khususnya.

Untuk maklumat lanjut sila ikuti pautan di bawah:

Terapi Solat
Solat merawat penyakit kritikal

Thursday, October 23, 2008

Low Yatt Price List

Salam sejahtera...

Blog ini ditulis khusus untuk pengunjung laman blog ini yang ingin mengetahui harga terkini barangan komputer yang dijual di kedai-kedai komputer di bangunan Low Yatt.

Antara kedai-kedai yang popular ialah Startec, C-Zone, Win Chance dan Jayacom. Sila klik pautan di bawah untuk mendapatkan senarai harga barangan komputer dari kedai-kedai tersebut:

Senarai Harga Terkini

Monday, October 13, 2008

Air Out Your Car Before Turning On The Aircon

Open the windows after you enter your car

In brief, the above article says: According to research done by a U.C., the car dashboard, sofa,
air freshener will emit Benzene, a cancer causing toxin (carcinogen). In addition to causing cancer,
it poisons your bones, causes anemia, and reduces white blood cells. Prolonged exposure will
cause Leukemia, increasing the risk of cancer. May also cause miscarriage.
Acceptable Benezene level indoors is 50 mg per sq. ft. A car parked indoors with the windows
closed will contain 400-800 mg of Benezene. If parked outdoors under the sun at a temperature
above 60 degrees F, the Benezene level goes up to 2000-4000 mg, 40 times the acceptable level.
The people inside the car will inevitably inhale an excess amount of the toxin.
It is recommended that you open the windows and door to give time for the interior to air out
before you enter. Benzene is a toxin that affects your kidney and liver, and is difficult for your
body to expel.

p/s I got the above article from an email forwarded to me. Not really sure whether it is true or not.

Tuesday, October 7, 2008

Family Takaful Business

Assalamualaikum/Salam Sejahtera...

Kepada sesiapa yang berminat dalam perniagaan takaful keluarga, anda adalah dialu-alukan untuk menghadiri kursus 'Family Takaful Business (FTB)' di Agensi Abdul Halim seperti di dalam maklumat di bawah:-

Tempat:No. 19A, Tkt 1,

Jln Bukit Ceding 28/4,

Tmn Alam Megah (Seksyen 28),

Shah Alam, Selangor.
Tarikh:1 dan 2hb. November 2008 (Sabtu dan Ahad)
Masa:8.30 am - 4.30 pm
Yuran:RM35 (bahan kursus disertakan)


Kursus dua (2) hari ini adalah wajib untuk melayakkan diri anda sebagai wakil takaful keluarga. Untuk maklumat lanjut sila hubungi saya di alamat e-mail: safuanlatif@yahoo.com atau telefon: 013-3378000.

Jangan lepaskan peluang untuk menjana pendapatan sekurang-kurangnya empat (4) angka. Anda boleh lakukan perniagaan ini secara separuh masa tanpa mengganggu pekerjaan sepenuh masa anda.

p/s Tarikh terpaksa diubah kepada 1 dan 2hb. November kerana ramai yang tidak dapat hadir untuk tarikh sebelum ini.

Wednesday, September 24, 2008

List of Culture Codes

The following list may be useful for programmers especially those .NET programmers who write application using resource files.

List of Culture Codes

Code

Language - Country/Region

Code

Language - Country/Region

af

Afrikaans

hu-HU

Hungarian - Hungary

af-ZA

Afrikaans - South Africa

is

Icelandic

sq

Albanian

is-IS

Icelandic - Iceland

sq-AL

Albanian - Albania

id

Indonesian

ar

Arabic

id-ID

Indonesian - Indonesia

ar-DZ

Arabic - Algeria

it

Italian

ar-BH

Arabic - Bahrain

it-IT

Italian - Italy

ar-EG

Arabic - Egypt

it-CH

Italian - Switzerland

ar-IQ

Arabic - Iraq

ja

Japanese

ar-JO

Arabic - Jordan

ja-JP

Japanese - Japan

ar-KW

Arabic - Kuwait

kn

Kannada

ar-LB

Arabic - Lebanon

kn-IN

Kannada - India

ar-LY

Arabic - Libya

kk

Kazakh

ar-MA

Arabic - Morocco

kk-KZ

Kazakh - Kazakhstan

ar-OM

Arabic - Oman

kok

Konkani

ar-QA

Arabic - Qatar

kok-IN

Konkani - India

ar-SA

Arabic - Saudi Arabia

ko

Korean

ar-SY

Arabic - Syria

ko-KR

Korean - Korea

ar-TN

Arabic - Tunisia

ky

Kyrgyz

ar-AE

Arabic - United Arab Emirates

ky-KG

Kyrgyz - Kyrgyzstan

ar-YE

Arabic - Yemen

lv

Latvian

hy

Armenian

lv-LV

Latvian - Latvia

hy-AM

Armenian - Armenia

lt

Lithuanian

az

Azeri

lt-LT

Lithuanian - Lithuania

az-AZ-Cyrl

Azeri (Cyrillic) - Azerbaijan

mk

Macedonian

az-AZ-Latn

Azeri (Latin) - Azerbaijan

mk-MK

Macedonian - Former Yugoslav Republic of Macedonia

eu

Basque

ms

Malay

eu-ES

Basque - Basque

ms-BN

Malay - Brunei

be

Belarusian

ms-MY

Malay - Malaysia

be-BY

Belarusian - Belarus

mr

Marathi

bg

Bulgarian

mr-IN

Marathi - India

bg-BG

Bulgarian - Bulgaria

mn

Mongolian

ca

Catalan

mn-MN

Mongolian - Mongolia

ca-ES

Catalan - Catalan

no

Norwegian

zh-HK

Chinese - Hong Kong SAR

nb-NO

Norwegian (Bokm�l) - Norway

zh-MO

Chinese - Macao SAR

nn-NO

Norwegian (Nynorsk) - Norway

zh-CN

Chinese - China

pl

Polish

zh-CHS

Chinese (Simplified)

pl-PL

Polish - Poland

zh-SG

Chinese - Singapore

pt

Portuguese

zh-TW

Chinese - Taiwan

pt-BR

Portuguese - Brazil

zh-CHT

Chinese (Traditional)

pt-PT

Portuguese - Portugal

hr

Croatian

pa

Punjabi

hr-HR

Croatian - Croatia

pa-IN

Punjabi - India

cs

Czech

ro

Romanian

cs-CZ

Czech - Czech Republic

ro-RO

Romanian - Romania

da

Danish

ru

Russian

da-DK

Danish - Denmark

ru-RU

Russian - Russia

div

Dhivehi

sa

Sanskrit

div-MV

Dhivehi - Maldives

sa-IN

Sanskrit - India

nl

Dutch

sr-SP-Cyrl

Serbian (Cyrillic) - Serbia

nl-BE

Dutch - Belgium

sr-SP-Latn

Serbian (Latin) - Serbia

nl-NL

Dutch - The Netherlands

sk

Slovak

en

English

sk-SK

Slovak - Slovakia

en-AU

English - Australia

sl

Slovenian

en-BZ

English - Belize

sl-SI

Slovenian - Slovenia

en-CA

English - Canada

es

Spanish

en-CB

English - Caribbean

es-AR

Spanish - Argentina

en-IE

English - Ireland

es-BO

Spanish - Bolivia

en-JM

English - Jamaica

es-CL

Spanish - Chile

en-NZ

English - New Zealand

es-CO

Spanish - Colombia

en-PH

English - Philippines

es-CR

Spanish - Costa Rica

en-ZA

English - South Africa

es-DO

Spanish - Dominican Republic

en-TT

English - Trinidad and Tobago

es-EC

Spanish - Ecuador

en-GB

English - United Kingdom

es-SV

Spanish - El Salvador

en-US

English - United States

es-GT

Spanish - Guatemala

en-ZW

English - Zimbabwe

es-HN

Spanish - Honduras

et

Estonian

es-MX

Spanish - Mexico

et-EE

Estonian - Estonia

es-NI

Spanish - Nicaragua

fo

Faroese

es-PA

Spanish - Panama

fo-FO

Faroese - Faroe Islands

es-PY

Spanish - Paraguay

fa

Farsi

es-PE

Spanish - Peru

fa-IR

Farsi - Iran

es-PR

Spanish - Puerto Rico

fi

Finnish

es-ES

Spanish - Spain

fi-FI

Finnish - Finland

es-UY

Spanish - Uruguay

fr

French

es-VE

Spanish - Venezuela

fr-BE

French - Belgium

sw

Swahili

fr-CA

French - Canada

sw-KE

Swahili - Kenya

fr-FR

French - France

sv

Swedish

fr-LU

French - Luxembourg

sv-FI

Swedish - Finland

fr-MC

French - Monaco

sv-SE

Swedish - Sweden

fr-CH

French - Switzerland

syr

Syriac

gl

Galician

syr-SY

Syriac - Syria

gl-ES

Galician - Galician

ta

Tamil

ka

Georgian

ta-IN

Tamil - India

ka-GE

Georgian - Georgia

tt

Tatar

de

German

tt-RU

Tatar - Russia

de-AT

German - Austria

te

Telugu

de-DE

German - Germany

te-IN

Telugu - India

de-LI

German - Liechtenstein

th

Thai

de-LU

German - Luxembourg

th-TH

Thai - Thailand

de-CH

German - Switzerland

tr

Turkish

el

Greek

tr-TR

Turkish - Turkey

el-GR

Greek - Greece

uk

Ukrainian

gu

Gujarati

uk-UA

Ukrainian - Ukraine

gu-IN

Gujarati - India

ur

Urdu

he

Hebrew

ur-PK

Urdu - Pakistan

he-IL

Hebrew - Israel

uz

Uzbek

hi

Hindi

uz-UZ-Cyrl

Uzbek (Cyrillic) - Uzbekistan

hi-IN

Hindi - India

uz-UZ-Latn

Uzbek (Latin) - Uzbekistan

hu

Hungarian

vi

Vietnamese