Welcome To My Blog

This blog contains posts that may benefit ordinary visitors or programmers (particularly .NET programmer).
To view posts related to particular subjects, click the link under Labels.

Monday, August 10, 2009

Using Web Service in ASP.NET

A Web Service (also Webservice) is defined by the W3C (World Wide Web Consortium) as "a software system designed to support interoperable machine-to-machine interaction over a network. It has an interface described in a machine-processable format (specifically WSDL - Web Service Description Language). Other systems interact with the Web service in a manner prescribed by its description using SOAP (Simple Object Access Protocol)-messages, typically conveyed using HTTP (Hyper Text Transfer Protocol) with an XML (Extended Markup Language) serialization in conjunction with other Web-related standards."


Please follow this link to get additional information about the web service from Wikipidia.


What is a web service in the context of ASP.NET? A web service can be considered as a remote software component. In this case, the component that resides in a hosting server offers functionalities that can be consumed by any application remotely via the internet.


CREATING A WEB SERVICE FILE


In ASP.NET, we can create a web service file with the extension ".asmx". We can use any of the .NET supported languages to write the codes. However, it is recommended to use C# programming language due to its efficiency and strong type support.

The picture below shows an example of a web service file.
As you can see from the picture, the web service file (asmx) has a page directive such as

<% @ WebService Language="VB" class="TestWS" %>

which describes the language used in the page and name of the class. In this case the language is VB.Net and the class name is TestWS.

Every method that you want to expose as a web method must be declared with the webmethod attribute and public access modifier. Once a method is declared as a web method, it can be called remotely by any other application via the web/internet.

Since the web service is using HTTP, it must be placed in a web application folder of the web server. This works almost similar to the ordinary web application.


CONSUMING THE WEB SERVICE

To consume a web method in the web service file, we must first create a proxy file in our machine using the WSDL tool that comes with Visual Studio. The following is an example how to use the WSDL command-line tool to create the proxy file (note that D:\webservice> is the DOS command prompt where you type the command -- D:\ is the drive and webservice is the folder name),

D:\webservice>wsdl http://www.wakiltakaful.com/mywebservice/testws_vb.asmx
/language:vb /namespace:safuan

In this case, the default output file that is created will be named TestWS.vb and the content is as shown as in the picture below.

Now we can use the VB command-line compiler to compile the proxy file to an assembly as shown below:
D:\webservice>vbc testws.vb /target:library
The output file will be testws.dll.

Once you have the assembly, you may make reference to it in your winform or webform application. If you use Visual Studio, the assembly will be copied locally in the bin folder of the application folder.

The picture below shows how the proxy is added to a web application folder.
And the picture below shows the VB code to use the proxy.
And finally the picture below shows how the web service works!
Remember that the assembly only contains the definition not the actual program logics. The program logics is in the web service file located in the remote server. In other words, you still must have a working internet in order to use the web methods.

Tuesday, August 4, 2009

Opening A Web Application From VS2005


Welcome back... In this article I would like to tell how to open a web application that you have copied from somebody else from Visual Studio 2005. I am assuming that you have a running Internet Information Services (IIS) in your system.

Simply follow the steps below:
  1. Copy the folder containing the web application to the \Inetpub\wwwroot folder. (This is the default folder for IIS.)Note: Actually, you may copy the application folder to any folder in any drive but it will be easier if you copy it to the default folder used by IIS.
  2. Open IIS. In IIS, expand the Default website folder until you see the application folder you just copied. (It may appear with yellow folder icon.) Right click the folder name and choose Properties from the context menu that appears. Click the Create button from the dialog box followed by the OK button.

    The yellow folder icon changed to an opened package icon as shown below.
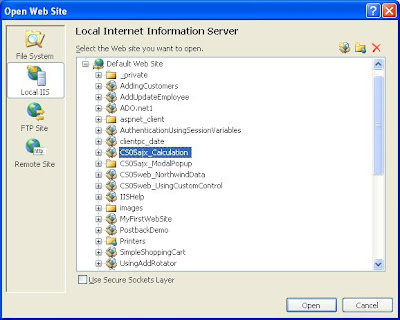
  3. Open Visual Studio 2005. In VS2005, open the File menu and choose Open Web Site. In the Open web site dialog box, click the Local IIS tab and select the web site you want to open followed by the Open button.

Thursday, March 19, 2009

ADAB MENDENGAR AZAN

ADAB MENDENGAR AZAN

Kematian itu pasti menjelma. Hanya masa Dan waktunya Yang tidak Kita ketahui.Cuba Kita amati. Mengapa Kebanyakan orang yg nazak, hampir ajal tidak dapat Berkata apa-apa.. Lidahnya kelu, keras Dan hanya mimik Mukanya yang menahan kesakitan ' sakaratul maut' .

Diriwayatkan sebuah hadis yg bermaksud:

'Hendaklah Kamu mendiamkan diri ketika azan, jika tidak Allah Akan kelukan lidahnya ketika maut menghampirinya. '

Ini jelas menunjukkan, Kita disarankan agar mendiamkan Diri, jangan berkata apa-apa pun semasa azan Berkumandang . Sebagai orang beragama Islam Kita wajib Menghormati azan Banyak fadhilatnya .

Jika lagu Kebangsaan Kita diajar agar berdiri tegak Dan diamkan Diri. Mengapa ketika azan Kita tidak boleh mendiamkan diri? Lantas sesiapa yang berkata-kata ketika azan, Allah Akan kelukan lidahnya ketika nazak . Kita takut dengan Kelunya lidah Kita semasa ajal hampir tiba maka Kita Tidak dapat mengucap kalimah 'Lailahaillallah. .' yang Mana sesiapa yang dapat mengucapkan kalimah ini ketika Nyawanya akan dicabut Allah dgn izinNya menjanjikan Syurga untuk mereka.

Dari itu marilah kita sama-sama menghormati azan dan mohon kepada Allah supaya lidah ini tidak kelu semasa nyawa kita sedang dicabut. 'Ya Allah! Anugerahkanlah kematian kami dengan kematian yang baik lagi mulia, lancarkan lidah kami mengucap kalimah 'Lailahaillallah. .' semasa sakaratul maut menghampiri kami.. Amin... amin.. amin Yarobbala'lamin. .'

Sesuatu yang tak pernah terjangkau dek akal fikiran ku ini. Subhanallah. ..

Ketahuilah bahawa pada setiap waktu, ribuan bilal di merata dunia akan melaungkan azan, mengakui 'Bahawa Allah Sahaja Yang Patut Disembah, dan Nabi Muhammad Adalah Rasul Allah.'Dimulakan dengan Indonesia yang terletak dibahagian timur dengan ratusan kepulauan-nya dan jumlah penduduknya seramai 180 juta.

Sebaik masuk waktu Subuh, Azan mula berkumandang dari kawasan ini dengan ribuan Bilal yang akan melaungkan Ke-Agungan Allah S.W.T Dan Nabi Muhammad S.A.W.
Proses ini akan bergerak kearah barat kepulauan Indonesia . Perbezaan masa antara timur dan barat Indonesia adalah 1-1/2 jam.Belumpun laungan Azan dimerata Indonesia selesai, ianya bermula pula di Malaysia.Berikutnya di-Burma dan dalam masa satu jam selepas Azan dilaungkan di-Jakarta, tiba giliran Dacca di Bangladesh.Berikutn ya laungan akan kedengaran di Calcutta dan terus ke Srinagar dibarat India.

Perbezaan waktu dikota-kota Pakistan adalah 40 minit jadi dalam jangka masa ini, Azan akan berkumandang diseluruh Pakistan.Belum berakhir di-Pakistan, Azan akan bermula pula di Afghanistan dan Muscat.Perbezaan waktu antara Muscat dan Baghdad adalah satu jam. Dalam jangka masa ini, Azan akan berterusan dilaungkan di UAE, Makkah, Madinah, Yaman, Kuwait dan Iraq .

Proses ini berterusan setiap detik sehingga ke pantai timur Atlantik.Jarak masa Azan mula dilaungkan di Indonesia sehingga ke pantai timur Atlantik adalah 9-1/2 jam.Belumpun Azan Subuh berkumandang di pantai Timur Atlantik, Azan Zuhur kini sudah mula dilaungkan di Indonesia. Ini berterusan bagi setiap waktu sembahyang, tidak putus-putus.

Subhanallah, begitu hebat dan agungnya Islam!
Kalaulah setiap kawasan boleh memasang pembesar suara (yang power habis!), akan bergegar satu dunia dengan laungan Azan tidak putus-putus.

Allahu Akhbar!

p/s Petikan di atas di ambil dari e-mail yang dihantar kepada saya.

Tuesday, February 17, 2009

Using Private Assembly in C# VS2005

This article is intended to beginner/medium level programmer.

Before we continue, let me explain first about the term "assembly" in C#. An assembly is simply a project that you have compiled either into a portable executable or DLL file. If you are using Visual Studio 2005 IDE to create your project, you will notice there are so many project templates that you can choose from. The templates range from Console applications, Windows application, Mobile applications and Web applications.

A project can only be compiled into an EXE assembly if it has the Main method, or else it will be a DLL assembly only.

The assemblies are further categorized into two types - private or shared assemblies. In this article, I will focus on the Private Assembly.

A private assembly may have the extension EXE or DLL. It is termed "private" because the assembly is not shared. Meaning that if you make a reference to a private assembly in your new project, you have to copy the private assembly to the bin folder of your new project. If you are using the VS2005 IDE, copying is done automatically when you Add Reference to the private assembly in the new project. Hence, every time we make a reference to a private assembly, we make a copy of that assembly in the new project.

To understand how to use a private assembly in C#, let we do the following steps to create a class library:
  1. Open VS2005 and create a new project. Make sure you select Visual C# --> Windows --> Class Library.

  2. Named the project as Converter. After a while, the code window appears.

  3. Rename the Class1.cs to Convert.cs in the Solution Explorer window.

  4. Add two methods to the class. One to convert temperature from Celcius to Fahrenheit and another to convert from Fahrenheit to Celcius.
  5. Click the Build menu and choose Build Converter to compile the project.

Assuming that you have created your project in the Visual Studio 2005 default folder, the assembly "Converter.dll" can be found in the folder My Documents --> Visual Studio 2005 --> Projects --> Converter --> bin --> debug/release.

Now let's try to use the created assembly in our new project. Follow the steps below to start a Windows application:

  1. In Visual Studio 2005 IDE, start a new project. From the "New Project" dialog box, select Visual C# --> Windows --> Windows Application template.

  2. Add controls to the form as shown.

  3. Named the control respectively as follows:
    radioButton1 --> Name: rbnCelciusToFahrenheit, Text: Celcius To Fahrenheit
  4. radioButton2 --> Name: rbnFahrenheitToCelcius, Text: Fahrenheit To Celcius
    label1 --> Name: lblInstruction, Text: (blank)
    label2 --> Name: lblResult, Text: (blank)
    textbox1 --> Name: txtTemperature, Text: (blank)
    button1 --> Name: btnCalculate, Text: Calculate

  5. Right click "References" in the Solution Explorer window and select "Add Reference...". Click the Browse tab in the Add Reference dialog box. Navigate to the folder containing "Converter.dll" private assembly that you have created earlier. After clicking OK, you should see the name Converter appears under the References list. If you click the Converter, you notice Copy Local = true in the Properties window.

  6. Double click the btnCalculate. VS2005 IDE takes you to the code window and gives you the event handler named btnCalculate_Click. Add the code in the event handler as follows:

  7. Get back to the Form1 (design). Then, double click the rbnCelciusToFahrenheit and rbnFahrenheitToCelcius radio buttons. You will get the "
    rbnCelciusToFahrenheit_CheckedChanged" and "
    rbnFahrenheitToCelcius_CheckedChanged" respectively. Add codes to the both event handlers as shown:
  8. Now, run your program. Notice that even though the method for converting the temperature is not in the new project, we still be able to execute the code because we have added reference to the Converter assembly.

From the above practice, you see how easy it is to reuse codes that we have done earlier in other project.